
Installing Solaris 10 on a Compaq Presario 1500 Notebook
Downloading the CD Images
I have a slow internet connection so I decided to download the autoextract CD images for windows :
Solaris 10 11/06 x86 CD 1, for downloading onto Windows Only, Multi-language sol-10-u3-ga-x86-v1.exe 166.74 MB
Solaris 10 11/06 x86 CD 2, for downloading onto Windows Only, Multi-language sol-10-u3-ga-x86-v2.exe 200.97 MB
Solaris 10 11/06 x86 CD 3, for downloading onto Windows Only, Multi-language sol-10-u3-ga-x86-v3.exe 101.41 MB
Solaris 10 11/06 x86 CD 4, for downloading onto Windows Only, Multi-language sol-10-u3-ga-x86-v4.exe 261.09 MB
Solaris 10 11/06 x86 CD 5, for downloading onto Windows Only, Multi-language sol-10-u3-ga-x86-v5.exe 230.71 MB
When I executed the .exe file the CPU went to %100 utilization and a message box appears...
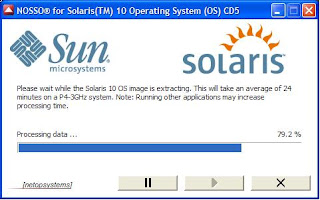
What?? 24 minutes on a Pentium 4 of 3 Ghz... Yes, it seems that the algorithm is very very complex... My CPU cried, it tought that I was running SETI@Home again.
My laptop (Pentium 4 - 2.4 ghz) took near 35 minutes per cd... so I spent 3 hours getting all the cds.
So if you don’t want to burn your CPU, download the iso images :
Solaris 10 11/06 x86 CD 1, Multi-language sol-10-u3-ga-x86-v1-iso.zip 308.14 MB
Solaris 10 11/06 x86 CD 2, Multi-language sol-10-u3-ga-x86-v2-iso.zip 373.95 MB
Solaris 10 11/06 x86 CD 3, Multi-language sol-10-u3-ga-x86-v3-iso.zip 168.22 MB
Solaris 10 11/06 x86 CD 4, Multi-language sol-10-u3-ga-x86-v4-iso.zip 588.05 MB
Solaris 10 11/06 x86 CD 5, Multi-language sol-10-u3-ga-x86-v5-iso.zip 437.26 MB
I burned the cds and noticed that each image only occupies half a CD, a waste of 3 cds.
Before Install
Unfortunately the magic number of a Solaris Partition is the same as a Linux Swap partition (the number “82”), so it is neccesary to be really carefull to avoid Linux overwriting all the Solaris partition, I remember many years ago when I installed a new RedHat Version on the same disk as an old Solaris and my Solaris was destroyed because Linux used the Solaris Partition as a Swap!!!
Another important things is that Solaris requieres a Primary Partition.
So I had to move my linux swap Partition to an Extended Partition, because Solaris could get confused.
But in my case I had to change another configuration, I’m testing Xandros on the same disk. And Xandros automatically generates the /etc/fstab file on every boot. So I had to deactivated this feature to avoid the Solaris partition getting overwritten, to do that I edited the file /sbin/etcdev2fstab
And changed the line :
My $flnm=”/etc/fstab”;
To :
My $flnm=”/etc/fstab2”;
In my case I didn’t have enogh unallocated space on my disk. So I had to defrag the NFTS partition consolidating all the free space and then shrink the partition. To do that there are various options. In my opinion PerfectDisk 8 is the best defragmentating utility, and another useful tools is Acronis Partition Manager or Partition Magic 8.
So my hard disk was configured as :
hda1 : NTFS - Windows XP
hda2 : Reiserf 3 - Xandros
The boot loader was LILO.
Starting Installation (Fasten Seat Belts)
I booted from install cd and accepted all the detected hardware, but something went wrong.
The detected hardware was :
Video Device : ATI Technologies Inc. Radeon Mobility M7 LW
Video Driver : XF86-RADEON
Resolution / Colors : 1024x768 - 256 colors
Screen Size : 15 – Inch (38 cm)
Monitor Type : Plug and Play Mfreq 15 Inch HSD1505 (up to 1345336625x758264139@-1979708863Hz)
My Display was split in four windows as you can see below.
So I spent more than 4 hours trying diferents video drivers, resolutions, monitor types.
The problem was that most of time when I tried different resolutions the display went all black and I had to reset the computer and start again.
At last!!! Yes At Last!!! I discovered that the following configuration worked well :
Video Device : ATI Technologies Inc. Radeon Mobility M7 LW
Video Driver : XF86-RADEON
Resolution / Colors : 1280x1024 16777216 Colors @ 85 Hz
Screen Size : 15 – Inch (38 cm)
Monitor Type : Multifrequency 90 Khz (up to 1600x1200 @ 72 Hz)
Keyboard Type : Generic Us-English (104-Key)
Poiting Device : Generic USB Mouse (3 button)
The Installation Screen appears :

And I relax for a while. Then I choosed the Instalation Type :

And click “Next”.
To my surprise the following screen appears :

“WARNING : A Linux fdisk partition was found on this disk (c0d0), which is the default bootdisk. Having a Linux fdisk partition on the same disk as Solaris fdisk partition is not supported.
Do you want to load the default layout?
Yes No”
What is that? I want to test Solaris on my disk, but I don’t want to uninstall Linux!!!
I really don’t like this kind of restrictions.
If I choose “YES” the default layout is all the hard disk for Solaris.... good bye Windows and Linux!I rebooted again, created a primary linux swap partition using Linux. Then when I reached that screen again I chose “NO” and selected the partition that I had created.

Finally the next screen “Ready to Install”

Then after a while the setup program asked for the location of the installation media, I choose “CDROM”, then it asked for the second CD, I inserted the CD, and I had to chose OK.
After 10 minutes the installation program asked again... about the installation media.!?!?
What? I’m installing using CDs.. so Why does the setup program ask again and again for all the 5 CDs???
Its crazy, but I had to select "from CD-ROM" five times. Then insert the CD, and press continue.
Finally after nearly an hour all the software was installed. So I Rebooted and Grub Appears:

Then I logged on and the desktop appeared.
After playing a little I was surprised by the old fashioned Screen Savers! They reminded me of the old times of the "after dark" screensaver in the beginning of the 90’s :
It has the classic Fireworks and the Spinning Lines :
 Some Issues
1. When I rebooted the computer the greeting was “Welcome to unknow”
I have my computer connected to a broadband internet service provider with DHCP. So I opened a console/terminal and run the command :
setuname –n Horus
Then change the file :
/etc/default/dhcpagent
Deleting the value number ‘12’ because 12 is query Hostname to the DHCP server.
Now the welcome screen is :

2. When booting I can see a Message in the console : “Loghost could not be resolved“
These was resolved when I added the word “loghost” in the file /etc/hosts
127.0.0.1 localhost loghost
Conclusion It wasn’t an easy installation, it took me aproximately 9 hours. I had to spend a lot of time decompressing the images, trying different video modes, and partitioning the hard disk to keep linux and solaris on the same hard disk.
If you want to install Solaris be really carefull with the partition manager. If I had chossen the “Default layaout” I would have destroyed completly the Linux and Windows installations on my hard disk.
Next steps
I will try to configure my external USB devices (printer, dvd writer, etc)
 Installing PC-BSD 1.3.01 on a Compaq Presario 1500
 I decided not to install the boot manager and selected the Advanced Setup in order to modify the disk partition.


